IoT technology is revolutionizing the way we interact with devices and systems in both professional and personal environments. As more devices become connected, understanding how to securely access IoT devices behind a router is crucial for maximizing their potential. In this article, we will explore a detailed example of accessing IoT devices using Raspberry Pi, providing practical insights and actionable advice.
Whether you're a hobbyist, an engineer, or a tech enthusiast, the ability to remotely control and monitor IoT devices is becoming increasingly important. This article will guide you through the process of setting up a Raspberry Pi to access IoT devices behind a router, ensuring secure and reliable communication.
By the end of this guide, you'll have a clear understanding of the tools, techniques, and best practices required to achieve seamless IoT connectivity. Let's dive in!
Read also:Zopalno A Comprehensive Guide To The Rising Star In Digital Innovation
Table of Contents
- Introduction to IoT and Raspberry Pi
- Raspberry Pi Setup for IoT
- Configuring the Network for IoT
- Understanding and Setting Up Port Forwarding
- Ensuring Secure Connections
- Implementing Remote Access
- Practical IoT Application Example
- Common Issues and Troubleshooting
- Best Practices for IoT Deployment
- Conclusion and Next Steps
Introduction to IoT and Raspberry Pi
What is IoT?
The Internet of Things (IoT) refers to the network of physical devices embedded with sensors, software, and connectivity that allows them to exchange data. IoT devices range from simple home appliances to complex industrial machinery, all designed to enhance automation and efficiency.
Why Use Raspberry Pi for IoT?
Raspberry Pi is a versatile, low-cost, single-board computer that has become a favorite among hobbyists and professionals alike. Its compatibility with various programming languages and hardware makes it an ideal platform for IoT projects. By leveraging Raspberry Pi, you can create powerful IoT solutions tailored to your specific needs.
According to a report by Statista, the global IoT market is expected to reach $1.5 trillion by 2030, underscoring the growing importance of IoT in modern technology.
Raspberry Pi Setup for IoT
Hardware Requirements
Before diving into the setup, ensure you have the following hardware components:
- Raspberry Pi (Model 3B+ or later recommended)
- MicroSD card (16GB or higher)
- Power supply
- Ethernet cable or Wi-Fi adapter
Having the right hardware is essential for a smooth setup process. Additionally, consider investing in a heatsink or fan to prevent overheating during prolonged usage.
Software Installation
Install the Raspberry Pi OS on your microSD card using the official Raspberry Pi Imager tool. Once the OS is installed, boot your Raspberry Pi and update the system using the following commands:
Read also:Fry 99net Your Ultimate Guide To Online Poker And Casino Entertainment
sudo apt update && sudo apt upgrade
Configuring the Network for IoT
Setting up the network is a critical step in accessing IoT devices behind a router. Follow these steps to configure your network:
- Connect your Raspberry Pi to the router via Ethernet or Wi-Fi.
- Assign a static IP address to your Raspberry Pi for consistent connectivity.
- Ensure your router's firewall settings allow communication with the IoT devices.
Refer to your router's manual for specific instructions on configuring network settings. A stable network connection is the foundation of successful IoT deployment.
Understanding and Setting Up Port Forwarding
What is Port Forwarding?
Port forwarding allows external devices to access specific services running on your local network. This is particularly useful for IoT devices that need to communicate with external systems.
How to Set Up Port Forwarding
Follow these steps to configure port forwarding on your router:
- Log in to your router's admin interface.
- Locate the port forwarding section and add a new rule.
- Specify the external and internal port numbers, along with the IP address of your Raspberry Pi.
For example, if you're running an IoT server on port 8080, forward this port to the Raspberry Pi's IP address. Always ensure that the ports you forward are secure and necessary for your application.
Ensuring Secure Connections
Why Security Matters
IoT devices are often targeted by cybercriminals due to their connectivity and potential vulnerabilities. Implementing robust security measures is essential to protect your devices and data.
Best Security Practices
Here are some tips to enhance the security of your IoT setup:
- Use strong, unique passwords for all devices and services.
- Enable encryption for data transmission using protocols like SSL/TLS.
- Regularly update your software and firmware to patch vulnerabilities.
- Monitor network activity for suspicious behavior.
According to a study by Symantec, over 50% of IoT devices are vulnerable to medium or high-severity attacks, highlighting the importance of proactive security measures.
Implementing Remote Access
Using SSH for Remote Access
Secure Shell (SSH) is a widely used protocol for securely accessing remote systems. Enable SSH on your Raspberry Pi by running the following command:
sudo systemctl enable ssh
Once SSH is enabled, you can connect to your Raspberry Pi from any device using an SSH client.
Alternative Remote Access Methods
Consider using tools like VNC or TeamViewer for graphical remote access. These tools provide a user-friendly interface for managing your IoT devices remotely.
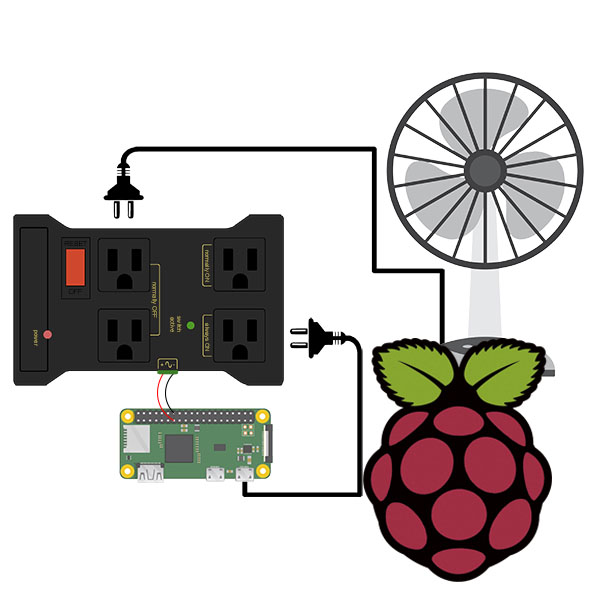
Practical IoT Application Example
Building a Smart Home System
One of the most popular IoT applications is smart home automation. Using Raspberry Pi, you can create a system that controls lights, thermostats, and security cameras. Here's a simple example:
- Install a GPIO-connected relay module to control appliances.
- Write a Python script to toggle the relay based on user input or scheduled events.
- Expose the script via a web interface for remote control.
This example demonstrates the flexibility and power of Raspberry Pi in IoT applications. With some creativity, you can expand this setup to include additional features and devices.
Common Issues and Troubleshooting
Network Connectivity Problems
If you're experiencing connectivity issues, check the following:
- Ensure your Raspberry Pi is properly connected to the router.
- Verify the IP address and subnet mask settings.
- Restart your router and Raspberry Pi to resolve temporary glitches.
Port Forwarding Failures
If port forwarding isn't working, review your router's configuration and ensure that the correct ports are forwarded to the Raspberry Pi's IP address. Additionally, check for conflicting rules that might interfere with your setup.
Best Practices for IoT Deployment
Plan Your Deployment
Before deploying IoT devices, create a detailed plan outlining your objectives, required hardware, and expected outcomes. This will help you stay organized and focused throughout the project.
Monitor and Maintain Your System
Regularly monitor your IoT system for performance and security issues. Implement maintenance routines to ensure that all components are functioning optimally.
Conclusion and Next Steps
In conclusion, accessing IoT devices behind a router using Raspberry Pi is a powerful way to enhance connectivity and automation. By following the steps outlined in this article, you can create a secure and efficient IoT setup tailored to your needs.
We encourage you to share your thoughts and experiences in the comments section below. Additionally, explore our other articles for more insights into IoT and Raspberry Pi projects. Together, let's build a smarter, more connected world!